This post is for Ionic React framework using Capacitor. In this post you’ll learn how to implement push notifications in Ionic-React apps, using Firebase. First, First half will cover this feature for Android apps, second half deals with iOS apps.
If you are looking for Push notification functionality in
- Ionic Angular app — Please check this blog
- React Native app — Please check this blog
- Ionic React app / Capacitor app — Continue reading ?
As you can see from above, there are several options available for Hybrid app development these days, and it is easy to get confused between them. This post is focussed on Ionic framework with React as the front-end framework, and Capacitor as runtime and build environment.
Let’s see a brief intro to each of the included frameworks:
- Ionic
- Capacitor
- Ionic-React
- Firebase
What is Ionic ?
You probably already know about Ionic, but I’m putting it here just for the sake of beginners. If you create Native apps in Android, you code in Java/Kotlin. If you create Native apps in iOS, you code in Obj-C /Swift. Both of these are powerful but complex languages. With Ionic and Capacitor you can write a single piece of code for your app that can run on both iOS and Android (and windows!), that too with the simplicity of HTML, CSS, and JS.
It is important to note the contribution of Capacitor/Cordova in this. Ionic is only a UI wrapper made up of HTML, CSS and JS. So, by default, Ionic cannot run as an app in an iOS or Android device. Capacitor/Cordova is the build environment that containerizes (sort of) this Ionic web app and converts it into a device installable app, along with providing this app access to native APIs like Camera etc.
What is Capacitor ?
Cordova helps build Ionic web app into a device installable app. But there are some limitations of Cordova, which Capacitor tries to overcome with a new App workflow.
Capacitor is a cross-platform app runtime that makes it easy to build web apps that run natively on iOS, Android, Electron, and the web. Ionic people call these apps “Native Progressive Web Apps” and they represent the next evolution beyond Hybrid apps.
Capacitor is very similar to Cordova, but with some key differences in the app workflow
Here are the differences between Cordova and Capacitor
- Capacitor considers each platform project a source asset instead of a build time asset. That means, Capacitor wants you to keep the platform source code in the repository, unlike Cordova which always assumes that you will generate the platform code on build time
- Because of the above, Capacitor does not use
config.xmlor a similar custom configuration for platform settings. Instead, configuration changes are made by editingAndroidManifest.xmlfor Android andInfo.plistfor Xcode - Since platform code is a source asset in Capacitor, you can directly change the native code using Xcode or Android Studio. This give more flexibility to developers
In essence, Capacitor is like a fresh, more flexible version of Corodva.
Plugins
Cordova and Ionic Native plugins can be used in Capacitor environment. However, there are certain Cordova plugins which are known to be incompatible with Capacitor.
Other than that, Capacitor also doesn’t support plugin installation with variables. Those changes have to be done manually in the native code.
Why Ionic React ?
(Read carefully)
Since Ionic 4, Ionic has become framework agnostic. Now you can create Ionic apps in Angular, React, Vue or even in plain JS. This gives Ionic great flexibility to be used by all kinds of developers.
It is important to note that Ionic React apps are only supported by Capacitor build environment.
Same is not true for Ionic Angular apps — Ionic Angular apps are supported by both Cordova and Capacitor build environments.
Hence, if you want to build apps in Ionic React, you need to use Capacitor to build the app on device.
To build push notification functionality, you can either opt to
- Install a Cordova plugin for Push (I haven’t tried this yet, but I will), or
- Use Capacitor core push functionality
But since we are using Ionic-React, we need to stick to Capacitor.
I know it can get confusing as 4 frameworks are crossing their paths here. Bottom line for this post — Ionic + React + Capacitor + Firebase Push (using Capacitor core functionality, no Cordova)
Firebase
Firebase is a Backend-as-a-Service (BaaS) platform. It started as a YC11 startup and grew up into a next-generation app-development platform on Google Cloud Platform. It is getting popular by the day because of the ease of integration and variety of functionalities available on it.
Some of the quick integrations available with Firebase are
- Email Authentication
- Social logins — Google, Facebook, Twitter
- Real-time database
- Analytics
- Crashlytics
- Push notifications ⬅️ (See this for Ionic Cordova implementation)
- Remote config
- Cloud Functions
and much more. Firebase is quickly growing to become the most popular mobile app back-end platform.
Enough of story-telling, let’s dive into — How to implement Push notification in Ionic-React apps
Structure of post
I will go step-by-step so everyone can benefit
Android Push
- Create a Firebase project
- Create a basic Ionic-react app and connect to Firebase
- Implement Push Notification functionality
- Build app on Android, and Test
- Sending push from Firebase console
iOS Push
We will pick core layout & settings from Android section. Other than that we’ll follow these steps
- Apple/iOS project settings
- Prepare app for iOS a
- Build and test app on iOS
Let’s get started with Ionic React Push Notification app !
///// ANDROID PUSH /////
Step 1 — Create a Firebase project and find Push options
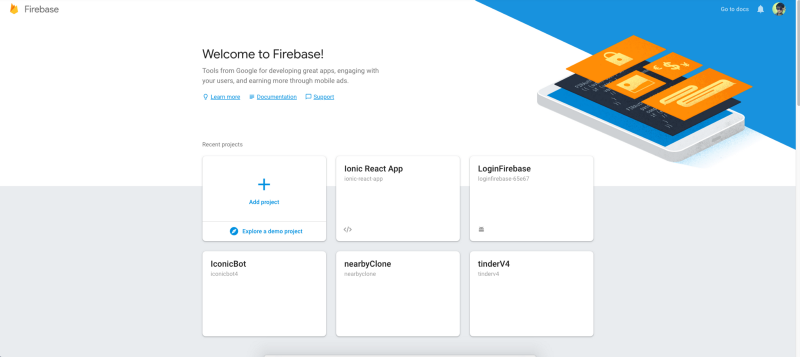
Go to Firebase and create your first project (or use an existing one). Your console should look like this
Note — It’s really easy to create a Firebase project, but if you still face any issue, follow step 1–4 of this blog
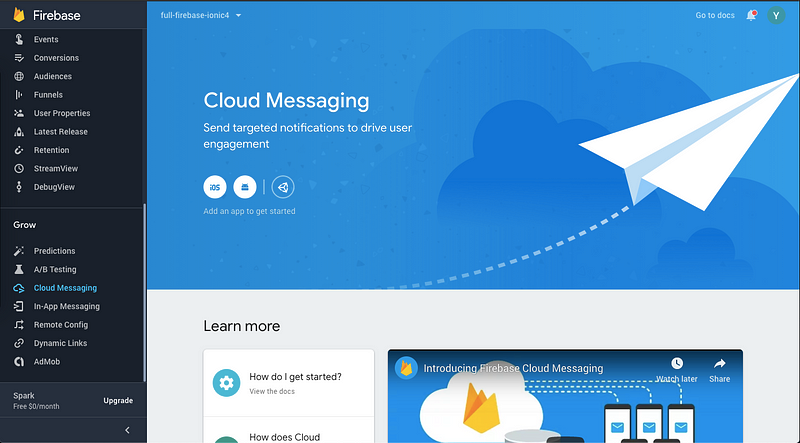
Click on your project and you’ll enter the project’s dashboard. Look for Cloud Messaging tab. This is where the magic will happen !
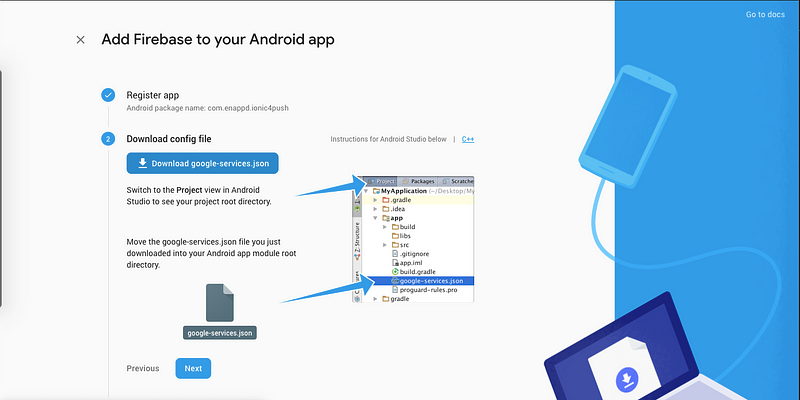
Create Android app in Firebase
For setting up options, you’ll first have to create an Android app in Firebase console. During the process, it will ask you to enter app’s package name and provide google-services.json.
Make sure you keep the package name same as what you are setting in ID of your Capacitor app
Step 2— Create a basic Ionic-React app
First you need to make sure you have the latest Ionic CLI. This will ensure you are using everything latest . Ensure latest Ionic CLI installation using
$ npm install -g ionic@latest
My env for this blog
# Ionic CLI - 6.16.3
# Node - 16.6.1 // Mac M1 chip works with Ionic-React with node>14
# React - 16.9.0
Creating a basic Ionic-React app is not much different or difficult from creating a basic Ionic-Angular app. Start a basic blank starter using
$ ionic start IonicReactPush blank --type=react --capacitor
--type=reacttold the CLI to create a React app, not an Angular app !!blankcreates a blank app--capacitorintegrates capacitor in the app
Run the app in browser using
$ ionic serve
Layout
You won’t see much in the homepage created in the starter. Let’s modify this page to include a button and a list to contain our push notifications
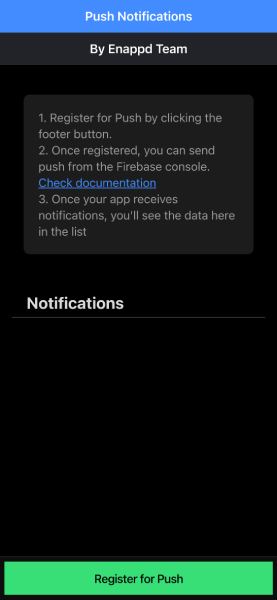
The code for this layout isn’t very complex
| import React, { useEffect, useState } from 'react'; | |
| import { IonContent, IonHeader, IonPage, IonTitle, IonToolbar, IonButton, IonFooter, IonList, IonCard, IonCardContent, IonItem, IonLabel, IonListHeader, IonText, IonButtons, IonMenuButton } from '@ionic/react'; | |
| export default function PushNotificationsContainer() { | |
| const nullEntry: any[] = [] | |
| const [notifications, setnotifications] = useState(nullEntry); | |
| return ( | |
| <IonPage id='main'> | |
| <IonHeader> | |
| <IonToolbar color="primary"> | |
| <IonTitle slot="start"> Push Notifications</IonTitle> | |
| </IonToolbar> | |
| <IonToolbar color="light"> | |
| <IonTitle slot="start">By Enappd Team</IonTitle> | |
| </IonToolbar> | |
| </IonHeader> | |
| <IonContent className="ion-padding"> | |
| <div> | |
| <IonList> | |
| <IonCard> | |
| <IonCardContent> | |
| 1. Register for Push by clicking the footer button.<br></br> | |
| 2. Once registered, you can send push from the Firebase console. <br></br> | |
| <a href="https://enappd.gitbook.io/ionic-5-react-capacitor-full-app/features/push-notifications" target="_blank">Check documentation</a><br></br> | |
| 3. Once your app receives notifications, you'll see the data here in the list | |
| </IonCardContent> | |
| </IonCard> | |
| </IonList> | |
| </div> | |
| <IonListHeader mode="ios" lines="full"> | |
| <IonLabel>Notifications</IonLabel> | |
| </IonListHeader> | |
| {notifications.length !== 0 && | |
| <IonList> | |
| {notifications.map((notif: any) => | |
| <IonItem key={notif.id}> | |
| <IonLabel> | |
| <IonText> | |
| <h3 className="notif-title">{notif.title}</h3> | |
| </IonText> | |
| <p>{notif.body}</p> | |
| </IonLabel> | |
| </IonItem> | |
| )} | |
| </IonList>} | |
| </IonContent> | |
| <IonFooter> | |
| <IonToolbar> | |
| <IonButton color="success" expand="full" >Register for Push</IonButton> | |
| </IonToolbar> | |
| </IonFooter> | |
| </IonPage > | |
| ) | |
| } | |
Capacitor Settings
Make sure your app ID / bundle ID matches the ID you provided in Firebase app. For my demo app, it is com.enappd.ionicreactpush
Set this ID in your capacitor.config.ts file under appId
Step 3 — Implement Capacitor Push functionality
Capacitor has in-built Push notification API. Install it with
$ npm install @capacitor/push-notifications
$ npm install @capacitor/toast // Optional, used in this demo
Import Push in your app/page with this
import { PushNotificationSchema, PushNotifications, Token, ActionPerformed } from '@capacitor/push-notifications';
As you just saw, Capacitor now installs each core API separately. This keeps the overall package lighter if you’re not using few of the plugins.
Let’s look at few of the important methods of Capacitor Push Notification API
1. Register function
Register function registers your device on FCM server. In response, you receive a token . FCM uses this token to identify your device. That’s how you can pin point a device to send push notifications. You can register simply by
PushNotifications.register();
2. Permissions
- Check push permission with
checkPermissions() - Request push permission with
requestPermissions()
3. Listeners
- addListener(‘registration’, …) — This listener will fire when your token registration is successful. You receive the
tokenin the response as well - addListener(‘registrationError’, …) — This listener will fire when your registration is not successful. Without a successful registration you won’t receive push on the device. If this happens, you can ask user to try to register again
- addListener(‘pushNotificationReceived’, …) — This listener is very important, as it fires when you receive the notification when the app is open (in foreground). The listener provides you the notification payload which you can use to show message to user
- addListener(‘pushNotificationActionPerformed’, …) — This listener is also very important, as it fires when you tap the notification received when the app is open or in background.
The listener provides you the data payload which you can use to show message to user, but the payload is a little different from the
pushNotificationReceivedlistener. You have to send useful information indatafield of the notification to receive it in this listener.titleandbodyfields are not received in this payload
Complete implementation of all this will look like the following
| import React, { useEffect, useState } from 'react'; | |
| import { IonContent, IonHeader, IonPage, IonTitle, IonToolbar, IonButton, IonFooter, IonList, IonCard, IonCardContent, IonItem, IonLabel, IonListHeader, IonText, IonButtons, IonMenuButton } from '@ionic/react'; | |
| import { PushNotificationSchema, PushNotifications, Token, ActionPerformed } from '@capacitor/push-notifications'; | |
| import './Home.css'; | |
| import { Toast } from "@capacitor/toast"; | |
| export default function PushNotificationsContainer() { | |
| const nullEntry: any[] = [] | |
| const [notifications, setnotifications] = useState(nullEntry); | |
| useEffect(()=>{ | |
| PushNotifications.checkPermissions().then((res) => { | |
| if (res.receive !== 'granted') { | |
| PushNotifications.requestPermissions().then((res) => { | |
| if (res.receive === 'denied') { | |
| showToast('Push Notification permission denied'); | |
| } | |
| else { | |
| showToast('Push Notification permission granted'); | |
| register(); | |
| } | |
| }); | |
| } | |
| else { | |
| register(); | |
| } | |
| }); | |
| },[]) | |
| const register = () => { | |
| console.log('Initializing HomePage'); | |
| // Register with Apple / Google to receive push via APNS/FCM | |
| PushNotifications.register(); | |
| // On success, we should be able to receive notifications | |
| PushNotifications.addListener('registration', | |
| (token: Token) => { | |
| showToast('Push registration success'); | |
| } | |
| ); | |
| // Some issue with our setup and push will not work | |
| PushNotifications.addListener('registrationError', | |
| (error: any) => { | |
| alert('Error on registration: ' + JSON.stringify(error)); | |
| } | |
| ); | |
| // Show us the notification payload if the app is open on our device | |
| PushNotifications.addListener('pushNotificationReceived', | |
| (notification: PushNotificationSchema) => { | |
| setnotifications(notifications => [...notifications, { id: notification.id, title: notification.title, body: notification.body, type: 'foreground' }]) | |
| } | |
| ); | |
| // Method called when tapping on a notification | |
| PushNotifications.addListener('pushNotificationActionPerformed', | |
| (notification: ActionPerformed) => { | |
| setnotifications(notifications => [...notifications, { id: notification.notification.data.id, title: notification.notification.data.title, body: notification.notification.data.body, type: 'action' }]) | |
| } | |
| ); | |
| } | |
| const showToast = async (msg: string) => { | |
| await Toast.show({ | |
| text: msg | |
| }) | |
| } | |
| return ( | |
| <IonPage id='main'> | |
| <IonHeader> | |
| <IonToolbar color="primary"> | |
| <IonTitle slot="start"> Push Notifications</IonTitle> | |
| </IonToolbar> | |
| <IonToolbar color="light"> | |
| <IonTitle slot="start">By Enappd Team</IonTitle> | |
| </IonToolbar> | |
| </IonHeader> | |
| <IonContent className="ion-padding"> | |
| <div> | |
| <IonList> | |
| <IonCard> | |
| <IonCardContent> | |
| 1. Register for Push by clicking the footer button.<br></br> | |
| 2. Once registered, you can send push from the Firebase console. <br></br> | |
| <a href="https://enappd.gitbook.io/ionic-5-react-capacitor-full-app/features/push-notifications" target="_blank">Check documentation</a><br></br> | |
| 3. Once your app receives notifications, you'll see the data here in the list | |
| </IonCardContent> | |
| </IonCard> | |
| </IonList> | |
| </div> | |
| <IonListHeader mode="ios" lines="full"> | |
| <IonLabel>Notifications</IonLabel> | |
| </IonListHeader> | |
| {notifications.length !== 0 && | |
| <IonList> | |
| {notifications.map((notif: any) => | |
| <IonItem key={notif.id}> | |
| <IonLabel> | |
| <IonText> | |
| <h3 className="notif-title">{notif.title}</h3> | |
| </IonText> | |
| <p>{notif.body}</p> | |
| {notif.type==='foreground' && <p>This data was received in foreground</p>} | |
| {notif.type==='action' && <p>This data was received on tap</p>} | |
| </IonLabel> | |
| </IonItem> | |
| )} | |
| </IonList>} | |
| </IonContent> | |
| <IonFooter> | |
| <IonToolbar> | |
| <IonButton color="success" expand="full" onClick={register}>Register for Push</IonButton> | |
| </IonToolbar> | |
| </IonFooter> | |
| </IonPage > | |
| ) | |
| } | |
You can attach the register() function ononClick event of the footer button, so you register on demand (simulating a situation where you ask user whether they want to receive notifications). I have simply attached register on page start, after permissions, so it will be auto registered.
<IonButton expand="full" onClick={() => this.push()}>Register for Push</IonButton>
That’s it ! Push notifications are integrated ! Now all we gotta do is … test ?
Step 4— Build app on Android, and test
Platform install
Install Android platform with
$ npm install @capacitor/android
$ npx cap add android
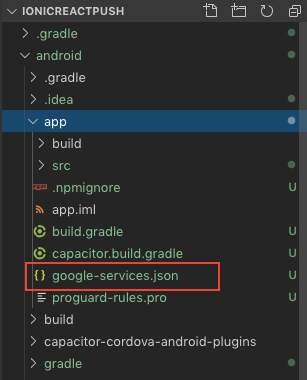
Add google-services.json
Add the downloaded google-services.json to your project in android/app folder
Configure gradle files
This step is not critical. Just make sure your gradle files are appropriately configured.
android/build.gradle file should have google-services and gradle in dependencies
dependencies {
classpath 'com.android.tools.build:gradle:4.2.1'
classpath 'com.google.gms:google-services:4.3.5'
}
Add push icon
Again, an optional step if you want a custom icon to show up when push are received
Push Notifications icon with the appropriate name should be added to the AndroidManifest.xml file:
<meta-data android:name="com.google.firebase.messaging.default_notification_icon" android:resource="@mipmap/push_icon_name" />Add the icon file in android/app/src/main/res mipmap folder. Make sure
- The icon name matches with what you mentioned in
AndroidManifest.xml(in my case it is push_icon_name.png) - Push icon should be white pixels on a transparent backdrop. Any color will be converted to white, so a multi-colored, non-transparent icon might just appear as a white box/round in the notification tray. I used the following

Build the app
Build the app once using
$ ionic buildSync your assets and plugins with Android platform using
$ npx cap sync android
Troubleshoot Tip
If you face an error saying
Capacitor could not find the web assets directory "/Users/abhijeetrathore/ionic-4-music/www".
Check your capacitor.config.json file. Make sure the webDir field has a value of www . If not, change the webDir field to have the same value as the last parameter of the url showing up in the above error
You should ideally open the project in Android Studio and run using the Android Studio IDE. Open the project in Android Studio using
$ npx cap open androidNow run the app in your device using Android Studio, and you get this ! (Sample from my One Plus 6T, Android P)
Note: After adding a platform, if you make any changes in the app, you need to runionic buildand thennpx cap syncto reflect those changes in the native platform
Test — Android
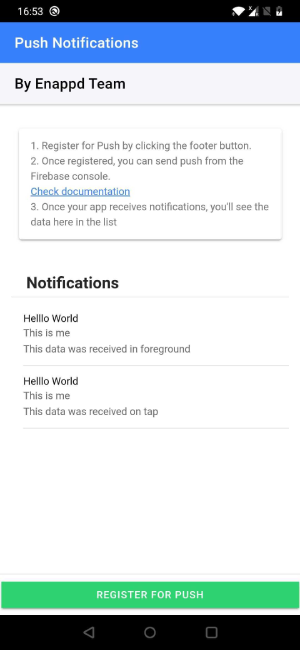
In the following test clip, you can see
- Device registers automatically and gives token (You can register on button click as well)
- First push comes in foreground, hence the data is directly received (no notification in bar) — pushNotificationReceived. This is also called silent push Because this doesn’t feel like a ‘real’ push, you can use Local Notification API of Capacitor to generate a notification for UX when push is received in foregroud
- Second push comes when app is minimized. On tap, the data is received in the app — pushNotificationActionPerformed
(If the GIF feels too fast) For clarification, following is the screenshot after two pushes arrive
Step 5- Sending push from Firebase console
To receive a push notification in the app, you will have to …. of course … send a notification first. You can do this from your server as well, but Firebase is easier.
We have a detailed tutorial on how to send Notifications using Firebase console
To send a notification, we can use Firebase console → Cloud messaging section.
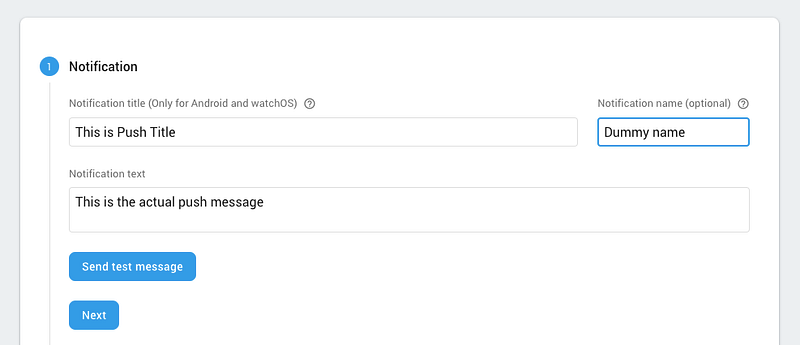
- Notification Title — This is the title that shows up in the push message in Android devices. iOS does not show this title on push messages
- Notification Text — This is the main body of the message. This is the text content that users see in the push notification
Enter both these info. Now, you have two choice
A. You can send a simple push notification, OR
B. You can send a test push notification using your registration token
Method B is very useful when you have a live app, and you don’t want your test push to go to every user. I’ll use this method to stick to development guidelines.
Sending test push notification — Method B
Click Send Test Message in the notification section. You will be presented with the following popup
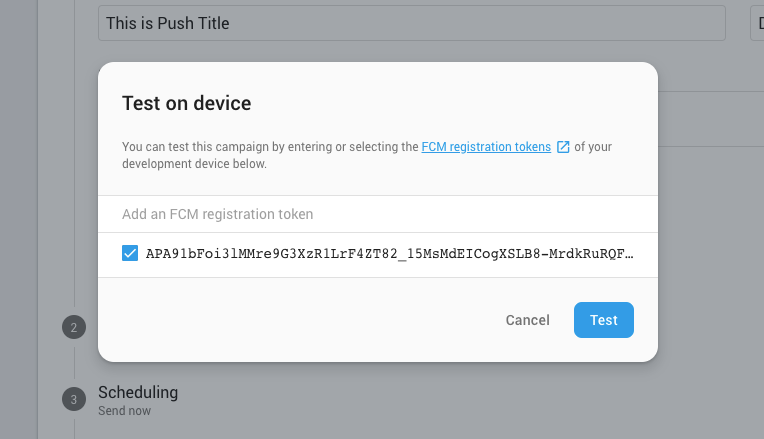
You need to find out your device’s device_token (which you received after registering the device on FCM) and enter that here. Click Send to send a test push notification to ONLY your device. So handy, right?
Case 1. Receive a push in Open app (in foreground)
In open app, you’ll receive the push without any notification in the notification tray. I have the notification data attached with the list, so the new notification will show up in the list, but you can always attach an alert or Local Notification in the pushNotificationReceived listener
I sent three push back to back, just in case you miss one. The data format received in foreground app is like this
{
"id":"0:1569331101047632%008d0b4c008d0b4c",
"data":{
"body":"This is my second push",
"title":"Test Push"
},
"title":"Test Push",
"body":"This is my third push"
}
Case 2. Receive a push in Background app (in background)
In minimized (background) app, you’ll receive the push with a notification in the notification tray. Once you tap the notification, the app with open, and the pushNotificationActionPerformed listener will be called. You can receive the data from this listener
The data format received in background app is like this
{
"actionId":"tap",
"notification":{
"id":"0:1628974753138149%3af2b6863af2b686",
"data":{
"google.delivered_priority":"high",
"google.sent_time":"1628974753129",
"google.ttl":"2419200",
"google.original_priority":"high",
"body":"This is me",
"from":"694030513078",
"title":"Helllo World",
"collapse_key":"com.enappd.ionreactfullapp"
}
}
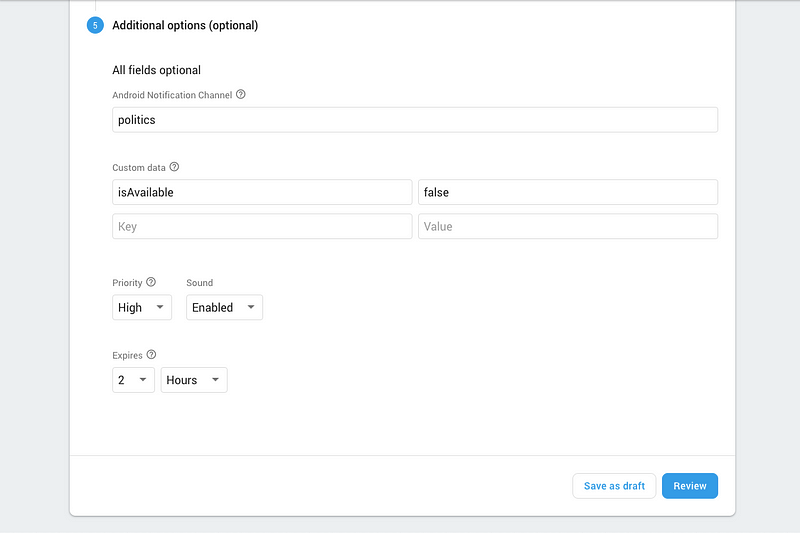
You can see here that you can access the title , body parameters inside the data field of the payload. This data field can be populated in Firebase console using Additional Options Section
Case 3. Receive a push in closed/killed app
In a closed app, you’ll receive the push with a notification in the notification tray. Once you tap the notification, the app with open and the same data as Case 2 will be received in the app. The input of the push from Firebase console will also has to be same as Case 2.
??? Congrats ! You just implemented Push notification functionality in Android using Capacitor Ionic React App !
///// iOS PUSH /////
To implement push notification in iOS, you’ll need following
- An apple developer paid account, where you can generate a push certificate
- A Macbook with Xcode
- iPhone device. Push will not work on Simulator
Without the above, you won’t be able to implement push notification on iOS (sadly). iOS eco-system is very strict.
Step 1 — Apple/iOS project settings
To be able to generate a push certificate for iOS app, you need a paid Apple developer account ($99/year). You can get more details onApple’s website.
Push certificate
Once you purchase the developer membership, you can generate a new Push Certificate by logging into your Apple developer account. Without going in too much detail, follow these steps
- In Apple Developer HomePage, click
Certificates, Identifiers and Profiles - Click the ‘ + ‘ button to create a new Push Certificate
- Select
Apple Push Notification service SSL (Sandbox)option if you are creating for dev purpose, ORApple Push Notification service SSL (Sandbox & Production)if you are creating for production purpose - Next, select the app Bundle ID you are creating the certificate for. If your app’s bundle ID (com.xx.xxxxx) is not registered with Apple yet, you can register it from the
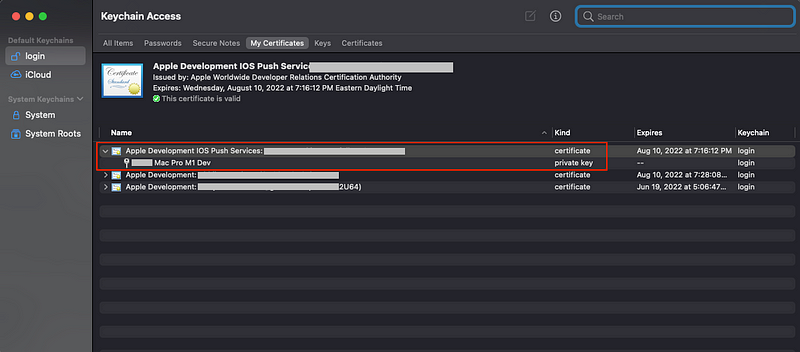
Identifierstab in theCertificates, Identifiers & Profilespage - Once app ID is selected, upload a Certificate Signing Request (CSR) from your mac. If you don’t have one, you can generate it from Keychain. Check instructions here.
- Once CSR is uploaded, generate the push certificate. Download it on your system and double click to install it in the Keychain
- Open Keychain and look for the certificate. Expand the item and select the attached P12 file. Export it to a safe location, and give a password for it when asked.
Firebase Project settings
- Now open your Firebase project. Go to Project Settings. Create a new iOS app (if you haven’t already) with the same bundle ID as the one you used for Push Certificate (and same as the app you are building).
- Download the
GoogleService-Info.plistfrom the iOS app. This will be used in next section - In Firebase console Project Settings → Cloud Messaging tab, select the iOS app you just generate. Upload the push key/certificate you generated in the given inputs. Make sure you upload the dev and push certificate in their corresponding inputs.
If you are using your own server to send push, you will have to include the .p12 or .pem file exported from your certificate to send the notifications.
Step 2 — Prepare app for iOS
iOS app platform
Install iOS platform with
$ npm install @capacitor/ios
$ npx cap add ios
You can sync the existing installed plugins and web assets using
$ npx cap sync ios
This will update the corresponding pods for iOS project.
Enable Push capability
Open the project in Xcode using
$ npx cap open ios
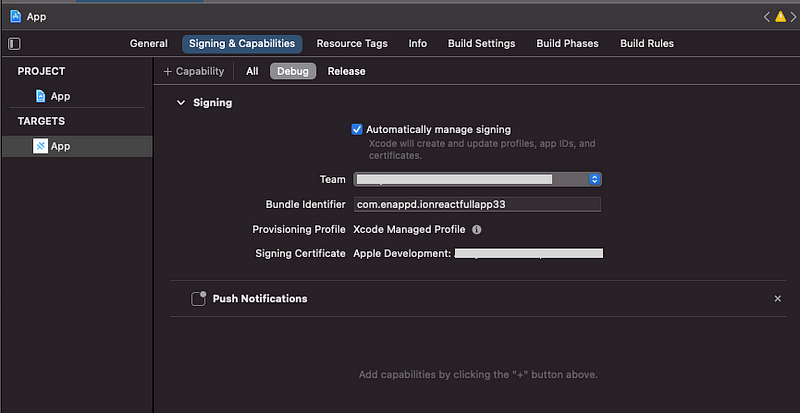
Click on App in left menu → Signing & Capabilities , select your development Team , keep Automatically Manage Signing checked.
Add Capability by clicking the ‘ + ‘ icon, select Push . Push notification capability will be added to your app
Add Firebase SDK for Push
We need to add Firebase to the Podfile, which can be found in Xcode under Pods or find it in your Ionic project under ios/App
Add pod ‘Firebase/Messaging’ in the Podfile along with other existing pods.
Run pod install in ios/App directory, OR just run npx cap update ios from root directory. This will install the required Firebase pods.
Xcode Capacitor Push API changes
- After enabling the Push Notifications capability, add the following to your app’s
AppDelegate.swift:
func application(_ application: UIApplication, didRegisterForRemoteNotificationsWithDeviceToken deviceToken: Data) {
Messaging.messaging().apnsToken = deviceToken
Messaging.messaging().token(completion: { (token, error) in
if let error = error {
NotificationCenter.default.post(name: .capacitorDidFailToRegisterForRemoteNotifications, object: error)
} else if let token = token {
NotificationCenter.default.post(name: .capacitorDidRegisterForRemoteNotifications, object: token)
}
})
}
func application(_ application: UIApplication, didFailToRegisterForRemoteNotificationsWithError error: Error) {
NotificationCenter.default.post(name: .capacitorDidFailToRegisterForRemoteNotifications, object: error)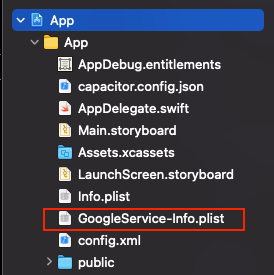
}- In your iOS project, add
GoogleService-Info.plisttoios/App/App
Xcode initialize Firebase
To connect to Firebase when your iOS app starts up, add an import at the top of the AppDelegate.swift file and FirebaseApp.configure()in the application(didFinishLaunchingWithOptions) method.
import Firebasefunc application(_ application: UIApplication, didFinishLaunchingWithOptions launchOptions: [UIApplication.LaunchOptionsKey: Any]?) -> Bool {
// Override point for customization after application launch.
FirebaseApp.configure()
return true
}Step 3 — Build and Test iOS app
Make sure you include all app changes in the iOS build by running
$ ionic build
$ npx cap sync ios
Build the app on physical device (iPhone), and test. It should ask you for permission at first. Then it should proceed pretty similar to Android.
Once again, you have foreground, background and killed app pushes. All data comes in the same format as explained in Android section — Step 5
??? Congrats ! You just implemented Push notification functionality in iOS using Capacitor Ionic React App !
Conclusion
In this post, you learnt how to implement Push notification functionality in your Ionic React apps using Capacitor. We used Firebase to send and receive push in the apps.
We tested the functionality on Android and iOS device.
We also tested push in each of open, minimized and closed app case.
Happy coding !